


Introduction
SigLIP2 a Vision Transformer (ViT) is the second generation of the Sigmoid Loss for Language Image Pre-training (SigLIP) model developed by Google DeepMind. It’s available in four sizes, from 86M to 1B parameters, with patch sizes of 14, 16, and 32. It’s open-source, with model checkpoints available on Hugging Face.
SigLIP2 a family of new multilingual vision-language encoders designed to improve upon the original SigLIP. It’s process and understand both images and text, for tasks like image classification, image-text retrieval, and feature extraction for vision-language models (VLMs).
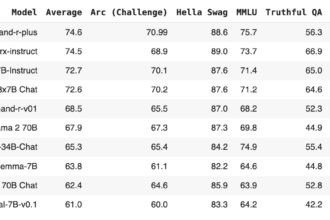
Resarchers at Google shows that using sigmoid loss can performs better then the traditional contrastive methods. It’s performs better on zero-shot image classification tasks, especially when scaling up model size and training data.
Why to Fine tune Siglip?
SigLIP2, trained on large image-text pairs, has a strong grasp of visual concepts, objects, and their relationships. This enables the model to leverage its strong underlying understanding and focus on mastering visual features specific to your specific classification problem, typically resulting in significantly better performance than training from scratch or training on gene features.
Fine Tuning Siglip 2
Today we will fine tune siglip2 on AI and Real Image classification task. For this we has a main folder with different labeled folders contain a large amount of images.
We will use the siglip2-base-patch16-224 model for today’s task. Let’s start the fine-tuning work with our dataset structured with ai and hum subfolders.
Our AI vs Human Trained Model is now available on hugging face: Ateeqq/ai-vs-human-image-detector
Below image is our fine tuning dataset format. The “ai” folder contain images generated by AI image generation model and “hum” folder contains images captured or designed by human.

Step 1: Install Required Packages
We begin by installing all the necessary packages, including libraries for evaluation, data handling, model training, image processing, and other utilities.
! pip install evaluate datasets accelerate torch torchvision torchaudio
! pip install git+https://github.com/huggingface/transformers.git
! pip install huggingface_hub

! pip install pandas scikit-learn matplotlib seaborn
! pip install pillow

! pip install imbalanced-learn
! pip install tensorboardX
Step 2: Importing Libraries and Configuration
Now, let’s import the required modules and suppress unnecessary warnings for a cleaner output.
import warnings
warnings.filterwarnings("ignore")

import gc
import numpy as np
import pandas as pd
import itertools
from collections import Counter
import matplotlib.pyplot as plt
import seaborn as sns # Use seaborn for nicer plots
from pathlib import Path

# Scikit-learn for metrics and potentially sampling
from sklearn.metrics import accuracy_score, confusion_matrix, classification_report, f1_score
from imblearn.over_sampling import RandomOverSampler # If using oversampling

# Hugging Face Libraries
import evaluate
from datasets import load_dataset, Dataset, Image as HFImage, ClassLabel # Renamed Image to HFImage to avoid conflict with PIL
from transformers import (
    TrainingArguments,
    Trainer,
    SiglipImageProcessor, # Use specific processor if known, or AutoImageProcessor
    SiglipForImageClassification,
    AutoImageProcessor, # Generally preferred
    DefaultDataCollator
)

# PyTorch and Torchvision
import torch
from torchvision.transforms import (
    Compose,
    Normalize,
    RandomRotation,
    RandomAdjustSharpness,
    Resize,
    ToTensor
)

# PIL for image loading
from PIL import Image as PILImage
from PIL import ImageFile, ExifTags
ImageFile.LOAD_TRUNCATED_IMAGES = True # Allow loading slightly corrupted images
Step 3: Loading and Preparing Your Dataset
IMPORTANT: Replace this with the actual path to your folder containing ‘ai’ and ‘hum’ or your specific dataset subfolders.
DATASET_PATH = r"C:\Users\ateeq\Downloads\datasets\cleaned"
MODEL_NAME = "google/siglip2-base-patch16-224"
OUTPUT_DIR = "ai-vs-hum" # Descriptive output directory
LEARNING_RATE = 5e-6 # Starting learning rate (tune if needed)
BATCH_SIZE = 2    # Adjust based on your GPU memory
NUM_EPOCHS = 5     # Adjust based on convergence
WEIGHT_DECAY = 0.01
UPLOAD_TO_HUB = False # Set to True if you want to upload later
HF_USERNAME = "ateeqq" # Required if UPLOAD_TO_HUB is True

print(f"Dataset path: {DATASET_PATH}")
print(f"Model: {MODEL_NAME}")
print(f"Output directory: {OUTPUT_DIR}")
Step 4: Splitting the Dataset
It’s crucial to have separate training and testing sets to evaluate model generalization. We’ll split our dataset, which ensures class distribution is maintained (stratification).
try:
    # Load dataset using 'imagefolder'
    dataset = load_dataset("imagefolder", data_dir=DATASET_PATH, split="train")
    print(f"Dataset loaded successfully from {DATASET_PATH}")
except Exception as e:
    print(f"Error loading dataset from {DATASET_PATH}: {e}")
    print("Please ensure the path is correct and the folder contains 'ai' and 'hum' subdirectories.")
    exit() # Stop if dataset loading fails

# Automatically Get Labels from 'imagefolder' (MODIFIED)
labels_list = dataset.features["label"].names
print(f"Found labels: {labels_list}")
if set(labels_list) != {'ai', 'hum'}:
     print("Warning: Expected labels 'ai' and 'hum'. Found:", labels_list)
     # You might want to add stricter checks or error handling here if needed

# Create label mappings (This part remains the same, uses extracted labels_list)
label2id = {label: i for i, label in enumerate(labels_list)}
id2label = {i: label for i, label in enumerate(labels_list)}
num_labels = len(labels_list)
ClassLabels = ClassLabel(num_classes=num_labels, names=labels_list)

print("\nMapping of IDs to Labels:", id2label)
print("Mapping of Labels to IDs:", label2id)

# Map Labels to Integers (No changes needed, imagefolder already does this)
# The 'label' column provided by 'imagefolder' is already integer IDs.
# We just need to ensure the 'ClassLabel' feature is set correctly for consistency.
dataset = dataset.cast_column('label', ClassLabels)
print("\nDataset labels verified.")

# Split the Dataset (MODIFIED - Use the loaded dataset)
split = dataset.train_test_split(test_size=0.2, shuffle=True, stratify_by_column="label")
train_data = split['train']
test_data = split['test']

print(f"\nDataset split into {len(train_data)} training examples and {len(test_data)} test examples.")
print("Train label distribution:", Counter(train_data['label']))
print("Test label distribution:", Counter(test_data['label']))
Step 5: Handling Class Imbalance (if needed)
Real-world datasets often suffer from class imbalance (some classes have many more examples than others). This can bias the model. One common technique is oversampling the minority classes in the training set.
Important: Apply oversampling only to the training data after splitting to avoid data leakage into the test set.
# Check for imbalance and apply Oversampling (if needed) to train_data
train_label_counts = Counter(train_data['label'])
# Check if counts exist and are non-zero before calculating ratio
is_imbalanced = False
if train_label_counts and min(train_label_counts.values()) > 0:
    ratio = max(train_label_counts.values()) / min(train_label_counts.values())
    is_imbalanced = ratio > 2.0 # Example threshold for imbalance
    print(f"Train data class ratio: {ratio:.2f}")
else:
    print("Warning: Could not calculate class ratio (empty counts or zero count). Skipping imbalance check.")


if is_imbalanced:
    print("\nClass imbalance detected in training data. Applying Random Oversampling...")
    # Convert training data to Pandas DataFrame for imblearn compatibility
    # Make sure the 'image' column contains file paths or loadable objects
    try:
        train_df = train_data.to_pandas()
    except Exception as e:
        print(f"Error converting train_data to Pandas DataFrame: {e}")
        print("Skipping oversampling.")
        train_df = None # Ensure train_df is defined

    if train_df is not None:
        # Separate features (image paths/objects) and labels
        # Check if 'image' column exists
        if 'image' not in train_df.columns:
            print("Error: 'image' column not found in DataFrame. Cannot perform oversampling.")
        else:
            X_train = train_df[['image']] # Keep image reference
            y_train = train_df['label']

            # Apply RandomOverSampler
            ros = RandomOverSampler(random_state=42)
            X_resampled, y_resampled = ros.fit_resample(X_train, y_train)

            # Create a new balanced DataFrame
            balanced_train_df = pd.DataFrame(X_resampled, columns=['image'])
            balanced_train_df['label'] = y_resampled

            # Convert back to Hugging Face Dataset object
            # Need to handle image loading from path if necessary
            # Assuming 'image' column contains file paths after resampling
            # This might require adjusting if 'image' contains PIL objects directly
            try:
                 # Create dataset ensuring Image feature is correctly specified
                 train_data = Dataset.from_pandas(balanced_train_df)
                 # Re-cast features (important!) - Use HFImage
                 train_data = train_data.cast_column("image", HFImage())
                 train_data = train_data.cast_column("label", ClassLabels)

                 print(f"Training data size after oversampling: {len(train_data)}")
                 print("New train label distribution:", Counter(train_data['label']))

            except Exception as e:
                 print(f"Error converting balanced DataFrame back to Dataset: {e}")
                 print("Proceeding without oversampling.")
                 train_data = split['train'] # Revert to original train_data if conversion fails


            # Clean up memory
            del train_df, X_train, y_train, X_resampled, y_resampled, balanced_train_df
            gc.collect()
else:
    print("\nTraining data appears relatively balanced or skipping check. No oversampling applied.")
Step 6: Setting Up the Model Processor and Image Preprocessing
Now, we load the SiglipForImageClassification model, configured for our specific number of labels and mappings.
SigLIP 2, like most vision models, requires specific image preprocessing (resizing, normalization). We’ll load the appropriate processor and define transformations. We also add data augmentation (random rotations, sharpness adjustments) to the training data to help the model generalize better.
# keep the AutoImageProcessor loading and _train_transforms/_val_transforms definitions
processor = AutoImageProcessor.from_pretrained(MODEL_NAME)
image_mean, image_std = processor.image_mean, processor.image_std
size = processor.size["height"]
normalize = Normalize(mean=image_mean, std=image_std)
_train_transforms = Compose([
    Resize((size, size)),
    RandomRotation(15),
    RandomAdjustSharpness(sharpness_factor=1.5, p=0.3),
    ToTensor(),
    normalize
])
_val_transforms = Compose([
    Resize((size, size)),
    ToTensor(),
    normalize
])
def apply_train_transforms(examples):
    # Ensure images are PIL objects before converting
    try:
        examples['pixel_values'] = [_train_transforms(img.convert("RGB")) for img in examples['image']]
    except AttributeError:
        # Handle case where examples['image'] might be paths - load them first
        examples['pixel_values'] = [_train_transforms(PILImage.open(img_path).convert("RGB")) for img_path in examples['image']]
    return examples

def apply_val_transforms(examples):
    try:
        examples['pixel_values'] = [_val_transforms(img.convert("RGB")) for img in examples['image']]
    except AttributeError:
        examples['pixel_values'] = [_val_transforms(PILImage.open(img_path).convert("RGB")) for img_path in examples['image']]
    return examples

train_data.set_transform(apply_train_transforms)
test_data.set_transform(apply_val_transforms)
Step 7: Minor adjustment for safety
Batches individual examples together. DefaultDataCollator works well here, but a custom one ensures correct tensor stacking.
# collate_fn (Minor adjustment for safety)
def collate_fn(examples):
    pixel_values = []
    labels = []
    for example in examples:
        # Ensure pixel_values is a tensor
        pv = example.get("pixel_values")
        lbl = example.get("label")
        if isinstance(pv, torch.Tensor) and lbl is not None :
            pixel_values.append(pv)
            labels.append(lbl)
        # else: # Optional: Add debugging if data is missing/malformed
            # print(f"Skipping example due to missing/invalid data: {example.keys()}")

    if not pixel_values: # Handle empty batch case
         return {"pixel_values": torch.empty(0), "labels": torch.empty(0, dtype=torch.long)}

    pixel_values = torch.stack(pixel_values)
    labels = torch.tensor(labels, dtype=torch.long)
    return {"pixel_values": pixel_values, "labels": labels}
Step 8: Load Model
Model loading remains the same, uses num_labels, id2label, label2id derived earlier
model = SiglipForImageClassification.from_pretrained(
    MODEL_NAME,
    num_labels=num_labels,
    id2label=id2label,
    label2id=label2id,
    ignore_mismatched_sizes=True
)
print(f"Trainable parameters: {model.num_parameters(only_trainable=True) / 1e6:.2f} M")
Output:
Some weights of SiglipForImageClassification were not initialized from the model checkpoint at google/siglip2-base-patch16-224 and are newly initialized: ['classifier.bias', 'classifier.weight']
You should probably TRAIN this model on a down-stream task to be able to use it for predictions and inference.
Trainable parameters: 92.89 M
Step 9: Set Evaluation Metric
We’ll use accuracy.
accuracy_metric = evaluate.load("accuracy")
def compute_metrics(eval_pred):
    # ... (keep the compute_metrics function as is) ...
    predictions, label_ids = eval_pred
    if isinstance(predictions, tuple): # Handle potential tuple output
        predictions = predictions[0]
    predicted_labels = np.argmax(predictions, axis=1)
    acc_score = accuracy_metric.compute(predictions=predicted_labels, references=label_ids)['accuracy']
    return {"accuracy": acc_score}
Step 10: Define Training Arguments
Define hyperparameters like learning rate, batch size, epochs, saving strategy, etc.
# Set up TrainingArguments and Trainer
args = TrainingArguments(
    output_dir=OUTPUT_DIR, # Use the updated output directory
    logging_dir=f'./{OUTPUT_DIR}/logs',
    evaluation_strategy="epoch", #eval_strategy="epoch" if you face TypeError: TrainingArguments.__init__() got an unexpected keyword argument 'evaluation_strategy'
    save_strategy="epoch",
    learning_rate=LEARNING_RATE,
    per_device_train_batch_size=BATCH_SIZE,
    per_device_eval_batch_size=BATCH_SIZE * 2,
    num_train_epochs=NUM_EPOCHS,
    weight_decay=WEIGHT_DECAY,
    warmup_ratio=0.1,
    load_best_model_at_end=True,
    metric_for_best_model="accuracy",
    save_total_limit=2,
    remove_unused_columns=False,
    push_to_hub=UPLOAD_TO_HUB, # Use configured value
    report_to="tensorboard", # Or "wandb", "none"
    hub_model_id=f"{HF_USERNAME}/{OUTPUT_DIR}" if UPLOAD_TO_HUB else None, # Set repo ID if pushing
    hub_strategy="end" if UPLOAD_TO_HUB else "every_save", # Push only best model at the end
)

trainer = Trainer(
    model=model,
    args=args,
    train_dataset=train_data,
    eval_dataset=test_data, # Use test_data for evaluation
    data_collator=collate_fn,
    compute_metrics=compute_metrics,
    tokenizer=processor, # Pass processor
)
Step 11: Training and Evaluation
With everything set up, let’s start the fine-tuning process! We’ll also evaluate the model before and after training.
# Optional evaluation before training
# print("\nEvaluating untrained model...")
# trainer.evaluate()

# Fine-tune the model
print("\nStarting training...")
train_result = trainer.train()
trainer.log_metrics("train", train_result.metrics)
trainer.save_metrics("train", train_result.metrics)


# Evaluate after training on the TEST set
print("\nEvaluating fine-tuned model on the test set...")
eval_metrics = trainer.evaluate(eval_dataset=test_data) # Explicitly evaluate on test_data
trainer.log_metrics("eval", eval_metrics)
trainer.save_metrics("eval", eval_metrics)

# Get predictions on the TEST set
print("\nGenerating predictions on the test set...")
outputs = trainer.predict(test_data)
print("Prediction Metrics (on test set):", outputs.metrics)
y_true = outputs.label_ids
y_pred = outputs.predictions.argmax(1)

# Calculate final metrics
accuracy_final = accuracy_score(y_true, y_pred)
f1_macro = f1_score(y_true, y_pred, average='macro')
f1_weighted = f1_score(y_true, y_pred, average='weighted')
print(f"\nFinal Test Accuracy: {accuracy_final:.4f}")
print(f"Final Test F1 Score (Macro): {f1_macro:.4f}")
print(f"Final Test F1 Score (Weighted): {f1_weighted:.4f}")
Output:
Starting training...
***** train metrics *****
  epoch                    =           5.0
  total_flos               = 51652280821GF
  train_loss               =        0.0799
  train_runtime            =    2:39:49.46
  train_samples_per_second =        69.053
  train_steps_per_second   =         4.316

Evaluating fine-tuned model on the test set...
***** eval metrics *****
  epoch                   =        5.0
  eval_accuracy           =     0.9923
  eval_loss               =     0.0551
  eval_runtime            = 0:02:35.78
  eval_samples_per_second =    212.533
  eval_steps_per_second   =      6.644

Generating predictions on the test set...
Prediction Metrics (on test set): {'test_loss': 0.05508904904127121, 'test_accuracy': 0.9923283699296264, 'test_runtime': 167.1844, 'test_samples_per_second': 198.039, 'test_steps_per_second': 6.191}

Final Test Accuracy: 0.9923
Final Test F1 Score (Macro): 0.9923
Final Test F1 Score (Weighted): 0.9923
Step 12: Analyzing Results
Let’s get predictions on the test set and analyze the performance using metrics like accuracy, F1-score, a confusion matrix, and a classification report.
import seaborn as sns

import matplotlib.pyplot as plt

def plot_confusion_matrix(cm, labels, figsize=(10, 7)):
    plt.figure(figsize=figsize)
    sns.heatmap(cm, annot=True, fmt='d', cmap='Blues', xticklabels=labels, yticklabels=labels)
    plt.xlabel('Predicted Labels')
    plt.ylabel('True Labels')
    plt.title('Confusion Matrix')
    plt.show()

if num_labels <= 50:
    cm = confusion_matrix(y_true, y_pred)
    plot_confusion_matrix(cm, labels_list, figsize=(max(6, num_labels // 2), max(5, num_labels // 2.5)))
else:
    print("\nSkipping confusion matrix plot due to large number of labels.")

print("\nClassification Report:")
print(classification_report(y_true, y_pred, target_names=labels_list, digits=4))
Output:

Classification Report:
              precision    recall  f1-score   support

          ai     0.9912    0.9935    0.9923     16549
         hum     0.9935    0.9912    0.9923     16560

    accuracy                         0.9923     33109
   macro avg     0.9923    0.9923    0.9923     33109
weighted avg     0.9923    0.9923    0.9923     33109
Step 13: Saving and Sharing the Model
Finally, save your fine-tuned model locally and (optionally) upload it to the Hugging Face Hub to share with the community.
# Save the model
print("\nSaving the best model...")
trainer.save_model() # Saves the best model to OUTPUT_DIR
print(f"Model saved locally to {OUTPUT_DIR}")# Optional: Upload to Hub logic (uses UPLOAD_TO_HUB, HF_USERNAME, OUTPUT_DIR)
if UPLOAD_TO_HUB:
from huggingface_hub import notebook_login, HfApi
print("\nPlease log in to Hugging Face Hub to upload the model:")
notebook_login()
api = HfApi()
repo_id = args.hub_model_id # Get repo_id from TrainingArguments
if not repo_id:
repo_id = f"{HF_USERNAME}/{OUTPUT_DIR}" # Fallback repo name
print(f"Warning: hub_model_id not set in args, using fallback: {repo_id}")
try:
print(f"\nCreating or verifying repository {repo_id} on Hugging Face Hub...")
api.create_repo(repo_id, exist_ok=True)
print(f"Repository {repo_id} ensured.")
print(f"Uploading model files from {OUTPUT_DIR}...")
# Use upload_folder to upload the contents of the output directory
api.upload_folder(
folder_path=OUTPUT_DIR,
repo_id=repo_id,
repo_type="model",
# Optionally add commit message, etc.
commit_message=f"Upload fine-tuned SigLIP2 model for {OUTPUT_DIR}"
)
print(f"Model successfully uploaded to {repo_id}")
except Exception as e:
print(f"Error uploading to Hugging Face Hub: {e}")
else:
print("\nSkipping upload to Hugging Face Hub (UPLOAD_TO_HUB is False).")
print("\nScript finished.")How to use the model?
Now that you’ve trained and saved your model (either locally or on the Hugging Face Hub), here’s how you can use it.
import torch
from PIL import Image as PILImage
from transformers import AutoImageProcessor, SiglipForImageClassification

# --------------------------------------------------------------------------
# 1. CONFIGURE: Set the path/ID of your fine-tuned model
# --------------------------------------------------------------------------

# OPTION A: If your model is saved locally
MODEL_IDENTIFIER = "siglip2-catagory1-vs-catagory2" # Or the exact path you saved it to

# OPTION B: If you uploaded your model to the Hub
# MODEL_IDENTIFIER = "Ateeqq/ai-vs-human-image-detector" # Replace with your actual Hub repo ID

# Path to the new image you want to classify
IMAGE_PATH = "path/to/your/image.jpg" # <--- CHANGE THIS

# Device: Use GPU if available, otherwise CPU
device = torch.device("cuda" if torch.cuda.is_available() else "cpu")
print(f"Using device: {device}")

# --------------------------------------------------------------------------
# 2. Load Model and Processor
# --------------------------------------------------------------------------
try:
    print(f"Loading processor from: {MODEL_IDENTIFIER}")
    processor = AutoImageProcessor.from_pretrained(MODEL_IDENTIFIER)

    print(f"Loading model from: {MODEL_IDENTIFIER}")
    model = SiglipForImageClassification.from_pretrained(MODEL_IDENTIFIER)
    model.to(device) # Move model to the appropriate device
    model.eval() # Set model to evaluation mode (disables dropout, etc.)
    print("Model and processor loaded successfully.")

except Exception as e:
    print(f"Error loading model or processor: {e}")
    print("Please ensure the MODEL_IDENTIFIER is correct and the model files exist.")
    exit()

# --------------------------------------------------------------------------
# 3. Load and Preprocess the Image
# --------------------------------------------------------------------------
try:
    print(f"Loading image: {IMAGE_PATH}")
    image = PILImage.open(IMAGE_PATH).convert("RGB")
except FileNotFoundError:
    print(f"Error: Image file not found at {IMAGE_PATH}")
    exit()
except Exception as e:
    print(f"Error opening image: {e}")
    exit()

print("Preprocessing image...")
# Use the processor to prepare the image for the model
inputs = processor(images=image, return_tensors="pt").to(device) # Ensure tensors are on the correct device

# --------------------------------------------------------------------------
# 4. Perform Inference
# --------------------------------------------------------------------------
print("Running inference...")
with torch.no_grad(): # Disable gradient calculations for inference
    outputs = model(**inputs)
    logits = outputs.logits

# --------------------------------------------------------------------------
# 5. Interpret the Results
# --------------------------------------------------------------------------
# Get the index of the highest logit score -> this is the predicted class ID
predicted_class_idx = logits.argmax(-1).item()

# Use the model's config to map the ID back to the label string ('ai' or 'hum')
predicted_label = model.config.id2label[predicted_class_idx]

# Optional: Get probabilities using softmax
probabilities = torch.softmax(logits, dim=-1)
predicted_prob = probabilities[0, predicted_class_idx].item()

print("-" * 30)
print(f"Image: {IMAGE_PATH}")
print(f"Predicted Label: {predicted_label}")
print(f"Confidence Score: {predicted_prob:.4f}")
print("-" * 30)

# You can also print the scores for all classes:
print("Scores per class:")
for i, label in model.config.id2label.items():
    print(f"  - {label}: {probabilities[0, i].item():.4f}")
You’ve now walked through the complete process of fine-tuning a SigLIP 2 model for single-label image classification! By leveraging its powerful pre-trained features and adapting it to your specific task, you can achieve strong performance on various image recognition problems.