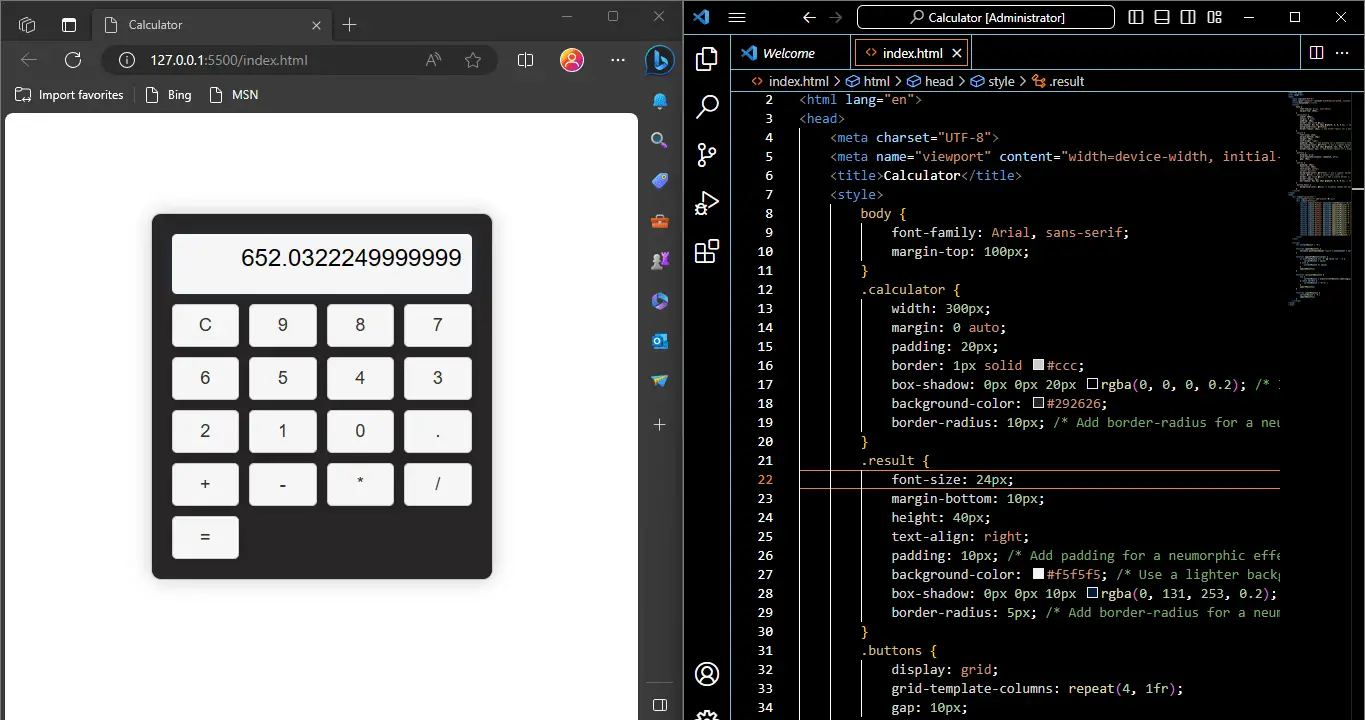
A calculator using HTML, CSS, and JavaScript is a web-based application that allows users to perform basic mathematical calculations directly in a web browser. It provides a user interface with buttons for numbers, operators (addition, subtraction, multiplication, division), and other functions (e.g., clear, equals), along with a display area to show the input and the calculated result.
Languages Contribution to develop a Calculator
Here’s a breakdown of how each of these technologies contributes to building a calculator:
- HTML (HyperText Markup Language): HTML is used to create the structure of the calculator. It defines the layout, elements, and their positioning on the web page. In the case of a calculator, HTML is used to create the buttons for numbers and operators, as well as the display area to show the results.
- CSS (Cascading Style Sheets): CSS is used for styling and designing the calculator. It helps in defining the colors, fonts, spacing, and overall visual appearance of the calculator. In the context of a neumorphic calculator (as previously discussed), CSS can be used to create a visually appealing and user-friendly design.
- JavaScript: JavaScript is responsible for the functionality of the calculator. It handles user interactions, such as button clicks, and performs the actual calculations. JavaScript code can capture user input, manipulate it based on the chosen operation, and display the result in the designated area.
How a calculator implemented?
Here’s a high-level overview of how a calculator implemented with HTML, CSS, and JavaScript typically works:
- Users click on number buttons to enter numeric values.
- Users click on operator buttons (+, -, *, /) to choose the desired operation.
- Users can click on additional buttons like “=” to calculate the result or “C” to clear the input.
- JavaScript code captures the user’s input and performs the calculations accordingly.
- The result is displayed in the designated display area on the web page.
The combination of these technologies allows developers to create interactive and user-friendly calculators that can be accessed and used directly from a web browser without the need for installing additional software.
Calculate Html, CSS & Javascript Code
<!DOCTYPE html>
<html lang="en">
<head>
    <meta charset="UTF-8">
    <meta name="viewport" content="width=device-width, initial-scale=1.0">
    <title>Calculator</title>
    <style>
        body {
            font-family: Arial, sans-serif;
            margin-top: 100px;
        }
        .calculator {
            width: 300px;
            margin: 0 auto;
            padding: 20px;
            border: 1px solid #ccc;
            box-shadow: 0px 0px 20px rgba(0, 0, 0, 0.2); /* Increase the shadow size */
            background-color: #292626;
            border-radius: 10px; /* Add border-radius for a neumorphic effect */
        }
        .result {
            font-size: 24px;
            margin-bottom: 10px;
            height: 40px;
            text-align: right;
            padding: 10px; /* Add padding for a neumorphic effect */
            background-color: #f5f5f5; /* Use a lighter background color */
            box-shadow: 0px 0px 10px rgba(0, 131, 253, 0.2); /* Add a subtle shadow */
            border-radius: 5px; /* Add border-radius for a neumorphic effect */
        }
        .buttons {
            display: grid;
            grid-template-columns: repeat(4, 1fr);
            gap: 10px;
        }
        .button {
            padding: 10px;
            font-size: 18px;
            text-align: center;
            cursor: pointer;
            background-color: #f5f5f5; /* Use a lighter background color */
            color: #333; /* Use a darker text color */
            border: 1px solid #ccc; /* Add a subtle border */
            border-radius: 5px;
            box-shadow: 0px 0px 10px rgba(0, 0, 0, 0.2); /* Add a subtle shadow */
        }
        .button:hover {
            background-color: #eee; /* Slightly change the background color on hover */
        }
    </style>
</head>
<body>
    <div class="calculator">
        <div class="result" id="result">0</div>
        <div class="buttons">
            <button class="button" onclick="clearResult()">C</button>
            <button class="button" onclick="appendToResult('9')">9</button>
            <button class="button" onclick="appendToResult('8')">8</button>
            <button class="button" onclick="appendToResult('7')">7</button>
            <button class="button" onclick="appendToResult('6')">6</button>
            <button class="button" onclick="appendToResult('5')">5</button>
            <button class="button" onclick="appendToResult('4')">4</button>
            <button class="button" onclick="appendToResult('3')">3</button>
            <button class="button" onclick="appendToResult('2')">2</button>
            <button class="button" onclick="appendToResult('1')">1</button>
            <button class="button" onclick="appendToResult('0')">0</button>
            <button class="button" onclick="appendToResult('.')">.</button>
            <button class="button" onclick="appendToResult('+')">+</button>
            <button class="button" onclick="appendToResult('-')">-</button>
            <button class="button" onclick="appendToResult('*')">*</button>
            <button class="button" onclick="appendToResult('/')">/</button>
            <button class="button" onclick="calculateResult('=')">=</button>
        </div>
    </div>

    <script>
        let currentResult = '0';

        function updateResult() {
            document.getElementById('result').textContent = currentResult;
        }

        function appendToResult(value) {
            if (currentResult === '0' && value !== '.') {
                currentResult = value;
            } else {
                currentResult += value;
            }
            updateResult();
        }

        function calculateResult() {
            try {
                currentResult = eval(currentResult).toString();
            } catch (error) {
                currentResult = 'Error';
            }
            updateResult();
        }

        function clearResult() {
            currentResult = '0';
            updateResult();
        }
    </script>
</body>
</html>
Let’s break down the provided code step by step:
- HTML Head (Lines 1-52):
- This code starts with the standard HTML document structure.
- It sets the document’s character set to UTF-8 and defines the viewport for responsive design.
- The title of the web page is set to “Calculator.”
- CSS Styles (Lines 7-50):
- CSS rules are defined to style the calculator and its components. These styles create a neumorphic (soft and tactile) design for the calculator.
- Various CSS properties such as
box-shadow,border-radius, andbackground-colorare used to achieve the neumorphic effect. - The calculator is centered on the page using
marginandwidthproperties.
- HTML Content (Lines 53-74):
- The calculator’s user interface is defined using HTML elements.
- Inside a
<div>element with the class “calculator,” you have two main components:- The result display is a
<div>with the class “result” and the initial content of “0.” It is right-aligned and styled for the neumorphic effect. - The buttons are contained in a
<div>with the class “buttons.” It uses CSS Grid (display: grid) to create a grid of buttons (16 buttons in total). - Each button is a
<button>element with the class “button.” The buttons are labeled with numbers (0-9), operators (+, -, *, /), and special functions (C for clear and = for calculation).
- The result display is a
- JavaScript (Lines 76-105):
- JavaScript code is included within a
<script>block at the end of the HTML body. - A variable
currentResultis declared and initialized to ‘0’. This variable stores the current input and result of calculations. - Four JavaScript functions are defined:
updateResult(): This function updates the content of the result display based on thecurrentResultvariable.appendToResult(value): This function appends the providedvalueto thecurrentResult. It handles the user’s input and updates the result display accordingly.calculateResult(): This function evaluates the current input using theeval()function and updatescurrentResultwith the calculated result. It also handles potential errors and displays “Error” if an invalid expression is entered.clearResult(): This function clears thecurrentResultand sets it back to ‘0’.
- Event listeners for button clicks are added directly in the HTML buttons using the
onclickattribute. When a button is clicked, it invokes the corresponding JavaScript function.
- JavaScript code is included within a
The combined HTML, CSS, and JavaScript code creates a functional neumorphic calculator with a user-friendly interface. Users can input numbers and perform basic calculations, and the results are displayed on the calculator’s screen. The CSS styles provide a visually appealing and tactile design.


